
|

|
How to create previews
|
Basic Preview Facts
| |
|
OK, so LJ has been bugging you to leave him alone and create your own previews.
But you don't understand a bit of the helpfile. Would be a waste to let all that
creative energy to waste, so here's a more detailed tutorial.
First: Previews are not a simulation of the player or anything. They are simply
formed by writing a file that says "put this picture here, and that one there,
and make everything in pink transparent". This file is of course not in plain
English, but in a special format with lots of <brackets> called XML.
Every picture you see in the preview is called a slide, and each slide
consists of a background and a number of images placed on top of it. All the
slides together form the slideshow. You can also see them in the Poster view.
A default file is embedded in H3Mod, and this is what you see when you look
at the preview. You can save it, so you have example data to work with. Then you
can make changes, load it again, and see how it looks then. Or you can start from
scratch, which the tutorial will do for simplicity. Once you like the results, you
can send the file to the author and say "Here are three extra screens, and I fixed
the position of the battery icons, and in the now playing screen, you need icon8
and not icon9". (Note: the actual content of your mail may vary...)
|
|
How to save, view and load slideshows
| |
|
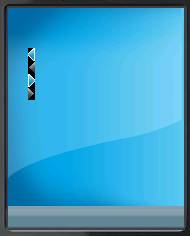
We'll start by saving an existing preview file. Load your firmware in
H3Mod and press F2 to open the preview. You see a picture
of the player with several buttons, marked by black rectangles. Move
your mouse over them, and you should see tooltips telling what each
one does. Here's the Sansa e200 as an example, the button positions
change from player to player.
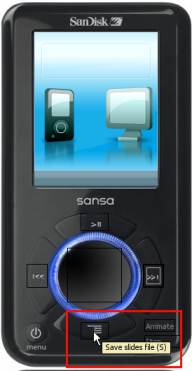
Or, even easier, use the keyboard shortcut and press S.
A file dialog opens, and you can save the file, with the ending .h3s.
Open the file you saved in notepad (or any other unicode enabled editor, but
notepad will do nicely).
Warning: Notepad only can handle unicode since
XP, I think. If you open the file and see nothing, or just one letter, or
lots of b l a n k s between letters, you need another editor. You could
try the free ConText, I use that myself.
You don't need to worry about the unicode thing when you create a slide file
from scratch, it's just the format H3Mod uses for saving them. It loads
normal ASCII files, too. If you don't know what any of this means, just
use notepad, create a fresh file there, and forget about it.
Look at the file: a scary amount of keywords and numbers, but basically,
a number of slide groups with elements in them. Close it again, and
we'll start by a completely fresh slideshow.
Loading is pretty much the same, only the shortcut is
L. Finding the button is left as an exercise to the reader...
|
|
Creating a blank slide
| |
And now for your first slide: create a new, empty file in notepad and type
or copy this code:
<H3Mod-Slides>
  <Slides>
    <Slide Name="Test" Background="">
    </Slide>
  </Slides>
</H3Mod-Slides>
save it, go to the H3Mod preview window, and load it. And look at the
glorious content! Er... well, it's not too impressive, but if you can
load it, you managed the basic workflow, everything else is just adding
more lines of text.
|
|
Adding a background
| |
Every screen has a background, sometimes nothing else, like for
boot screens. All you need to do is to specify
the name of the bookmark you want to use. The example is for
the Sansa again, check your player's bookmarks for the proper
names. Here we go:
<H3Mod-Slides>
  <Slides>
    <Slide Name="Test" Background="Background Blue">
    </Slide>
  </Slides>
</H3Mod-Slides>
|
|
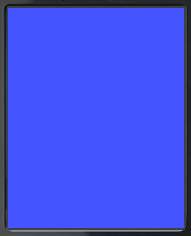
Monochrome colour backgrounds
| |
|
Occasionally, there is no background image, in that case you
can specify a colour. That's not too great, either, but a good
point to introduce the colour notation. You may need it later on.
Colours are in HTML notation. That gives you two ways of
specifying them:
- Keywords: some basic colours can be specified by their names,
like "White", "Black", "Magenta".
- Red-Green-Blue notation, like "#4455FF". The # is just a marker,
followed by two digits for the red, green, and blue parts that are
mixed. so "#000000" is black, and "#FFFFFF" is white. The numbers
are hexadecimal, so you use numbers and the letters A-F, where
A=10, B=11 etc. So in the example we have some red (44) a little
more green (55) and full blast blue (FF).
<H3Mod-Slides>
  <Slides>
    <Slide Name="Test" BackgroundColour="#4455FF">
    </Slide>
  </Slides>
</H3Mod-Slides>
|
|
Adding an image
| |
The next step is the most important one. Everything else is luxury,
but the basic need is to put a picture from the bookmarks somewhere.
This is done by adding elements to the slide. In the basic form,
you only need the name of the bookmark, and the position, in pixels:
<H3Mod-Slides>
  <Slides>
    <Slide Name="Test" Background="Background Blue">
      <Element Name="Status Bar Grey" Left="10" Top="10" />
    </Slide>
  </Slides>
</H3Mod-Slides>
mmmh, not quite right. Change the position until it looks the same
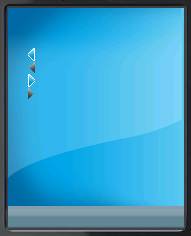
as on your player's screen. This is much better. And let's add a second
element, some arrows:
<H3Mod-Slides>
  <Slides>
    <Slide Name="Test" Background="Background Blue">
      <Element Name="Status Bar Grey" Left="0" Top="198" />
      <Element Name="Arrows" Left="20" Top="40" />
    </Slide>
  </Slides>
</H3Mod-Slides>
|
|
Making things transparent
| |
|
The arrows are on a black background, but on the player, they are
really just arrows over the background image. So we need to tell H3Mod
that bits of the element can be transparent, and also which colour.
Luckily all players work the same: they define one colour that is
just not displayed, as if it was transparent. This is specified in the
Slides element. In this case, it's black, represented in RGB notation.
In the element, you add the flag for transparency. Don't bother with
the type. "Simple" is enough for everything but the H300, and there the
previews are already done.
Attention: not all images on the player support transparency!
in some of them, black may just be displayed as black, for example.
The only way to find out is trying it.
<H3Mod-Slides>
  <Slides TransparentColour="#000000">
    <Slide Name="Test" BackgroundColour="Background Blue">
      <Element Name="Status Bar Grey" Left="0" Top="198" />
      <Element Name="Arrows" Left="20" Top="40" Transparency="Simple" />
    </Slide>
  </Slides>
</H3Mod-Slides>
|
|
Using segments of images
| |
|
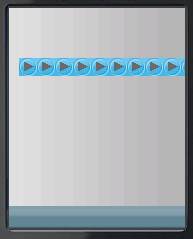
So far, so good, but there are actually four arrows in the bookmark, and
we need only one, let's say, the blue one pointing right. To do that, you
can cut vertical slices out of a bookmark image. You specify which line
should be top, and how many pixels below that line are displayed.
For the arrows we find that the whole picture is 7 x 52 pixels. Since
it's 4 arrows, divide by 4, and we see that one arrow is 13 pixels high.
We want the third one, therefore we need to skip the first 2 arrows,
that is 2 x 13 = 26 pixels: the value for the start line. And since
we only want to see one arrow, the height is limited to 13 pixels.
You can also just add the values to the end of the line, they are
only moved to the next line for display reasons here.
<H3Mod-Slides>
  <Slides TransparentColour="#000000">
    <Slide Name="Test" BackgroundColour="Background Blue">
      <Element Name="Status Bar Grey" Left="0" Top="198" />
      <Element Name="Arrows" Left="20" Top="40" Transparency="Simple"
        StartLine="26" Height="13"/>
    </Slide>
  </Slides>
</H3Mod-Slides>

|
|
Adding text
| |
|
An important bit of the looks of a screen is text. For some players,
the fonts are decoded from the firmware, and can be displayed exactly
as they are on the player. For others, you need to choose a system
font that looks similar to what is on the player.
Regardless, the text elements look almost like a graphics element.
You just add the tag that it's text, fore- and background colour,
and the name of the font. The Name attribute is the text that
is displayed.
For firmware with decoded firmware fonts, like the H300, just use
the name of the font as displayed in the fonts list. For others,
use the name of a Windows font, like they are displayed in,
for example, the notepad font selection. Prefix it by * to mark it as
a system font. You can also add attributes (bold,italic,underline or
any combination thereof), seperated by commas.
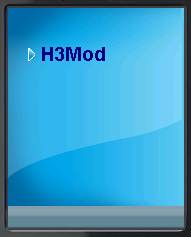
Let's add the name of the tool, in a font that is installed on every
Windows system. The linebreaks again are only for cosmetic reasons.
<H3Mod-Slides>
  <Slides TransparentColour="#000000">
    <Slide Name="Test" BackgroundColour="Background Blue">
      <Element Name="Status Bar Grey" Left="0" Top="198" />
      <Element Name="Arrows" Left="20" Top="40" Transparency="Simple"
        StartLine="26" Height="13"/>
      <Element Name="H3Mod" Left="30" Top="35" Transparency="Simple"
        Type="Text" Font="*Arial,bold" FontSize="14"
        Foreground="Navy" Background="#000000" />
    </Slide>
  </Slides>
</H3Mod-Slides>
|
|
Adding line graphics
| |
|
The worst thing for a preview is a prominent feature on the screen
that is not a bookmark in the firmware. You can't display it in
the slide, and everything looks completely different than the real thing.
Or can you? H3Mod is a very, very primitive paint program, too.
It can draw rectangles in different colours, that's all. But up
to now, that was enough, selection bars and seperator lines
(1-pixel rectangles) were all that's required.
An example says more than lots of blabbering, and by now you
are so familiar with the XML format that you can easily understand
the parameters. Note that the element has to be drawn before the
arrow and the text, or it would simply cover them.
<H3Mod-Slides>
  <Slides TransparentColour="#000000">
    <Slide Name="Test" BackgroundColour="Background Blue">
      <Element Name="Status Bar Grey" Left="0" Top="198" />
      <Element Name="Rectangle" Left="0" Top="33" Type="Graphic"
        Foreground="White" Width="176" Height="23" />
      <Element Name="Arrows" Left="20" Top="40" Transparency="Simple"
        StartLine="26" Height="13"/>
      <Element Name="H3Mod" Left="30" Top="35" Transparency="Simple"
        Type="Text" Font="*Arial,bold" FontSize="14"
        Foreground="Navy" Background="#000000" />
    </Slide>
  </Slides>
</H3Mod-Slides>
|
|
Repeating images
| |
|
A weird thing happens in some firmwares: an image is not
stored as one image, but only the first line is present and it
is repeated over and over again. This happens for backgrounds
and progress bars, for example.
Presumably, this is done to save space in the firmware.
Of course previews need to imitate that. It's very easy:
place the first instance of the image like any other
graphic, and then add the attribute Repeat with a
number. This many repetitions of the image will be drawn
to the right of the first one. Alternatively us RepeatVertical,
and the repetition happens downwards, below the first image.
As an example, here's a Sansa screen that may not exist in
real life, but is made up from elements that do exist in the
Sansa firmware. The background vertically repeats a mysterious line that
happens to be exactly the width of the screen. And the button is
really only there to prepare the next step.
<H3Mod-Slides>
  <Slides>
    <Slide Name="Test" Background="">
      <Element Name="Status Bar Grey" Left="0" Top="198" />
      <Element Name="Horizontal Strip Grey" Left="0" Top="0"
        RepeatVertical="197" />
      <Element Name="Button Play Blue 1" Left="10" Top="50"
        Repeat="10" />
    </Slide>
  </Slides>
</H3Mod-Slides>
|
|
Ovelapping repeating images
| |
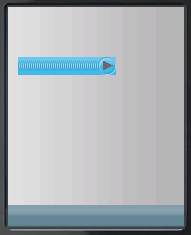
Imagine we want to use the button as a progress bar: a
blue bar with the grey arrow on the right side. This is how
some firmwares actually implement progress bars. To achieve that,
we need to repeat the icon. Not next to the previous one,
but overlapping it. You can define how many pixels the repetitions
should be apart. Default is the full image width, as above, but
let's set it to just 2 pixels for a cool slider element.
The new attribute is called RepeatStep.
<H3Mod-Slides>
  <Slides>
    <Slide Name="Test" Background="">
      <Element Name="Status Bar Grey" Left="0" Top="198" />
      <Element Name="Horizontal Strip Grey" Left="0" Top="0"
        RepeatVertical="197" />
      <Element Name="Button Play Blue 1" Left="10" Top="50"
        Repeat="40" RepeatStep="2"/>
    </Slide>
  </Slides>
</H3Mod-Slides>
|
|
Rotating images
| |
|
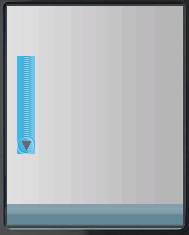
For reasons that only the developers, and maybe the gods, know,
images are stored in the firmware rotated, and not like they
appear on the screen. Luckily, only in steps of 90 degrees...
To fix that, H3Mod can also turn them for previews.
The value of the Rotate attribute stands for 90 degree steps clockwise.
Just for the heck of it, this can also be combined with
repetitions, in case you want to change a scrollbar. Do we?
Yes, we do! And for complete mayhem, we also change the
overlapping scrollbar to be vertical. You are really building a
bleeding edge preview here!
<H3Mod-Slides>
  <Slides>
    <Slide Name="Test" Background="">
      <Element Name="Status Bar Grey" Left="0" Top="198" />
      <Element Name="Horizontal Strip Grey" Left="0" Top="0"
        RepeatVertical="197" />
      <Element Name="Button Play Blue 1" Left="10" Top="50"
        RepeatVertical="40" RepeatStep="2" Rotate="1"/>
    </Slide>
  </Slides>
</H3Mod-Slides>
|
|
Animations
| |
|
Your player may have that cool screen saver animation, and you want to
preview it. No problem, as long as the animation consists of a number
of images of the same size. The animation only kicks in in the device
preview, the one where you see one screen at a time in the context
of the actual player. The poster simply displays it like a normal
image, since it is supposed to be saved as a bitmap.
You must add the Frames attribute, that is a list of the
bookmark names that form the animation, seperated by pipes (that's the
| sign).
Optionally, you can specify the delay between frames in ms, the default
if not specified is 100.
There is no image here, since I don't want to create an animated gif;
you can see real life example if you load Sansa, S10 or T10 firmware.
The example animates 4 images, pausing 800 ms between
frames. The poster preview shows the 3rd image of that animation.
No transparency, but it could easily be added, just like described
for images above.
<H3Mod-Slides>
  <Slides>
    <Slide Name="Battery" Background="New Battery Background">
      <Element Name="Status Bar Grey" Left="0" Top="198" />
      <Element Name="New Battery 3" Left="30" Top="106" Type="Animation"
	  Frames="New Battery 1|New Battery 2|New Battery 3|New Battery 4"
	  Delay="800" />
    </Slide>
  </Slides>
</H3Mod-Slides>
|
|
Tips for precise previews
| |
|
And that's it. These are the elements that allow you to simulate
the player's screens, as long as the images were found. Not that
difficult, is it?
The ultimate goal is a preview that is 100% accurate, every
image at the exact same position as on the player. That is not
easy, but very helpful for designers. They can do all kinds of
tricks with icons and backgrounds and be confident that their
player will look like the preview, and not 3 pixels off.
The H300 is pretty much there, and I found the following tactics
very useful to achieve precision:
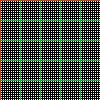
- Use this grid pattern and create backgrounds from it. Every
background should look like it, add a name to distinguish different
backgrounds.
- Every image should be rectangular. So, if there is any transparency,
replace that colour by something else, preferably a colour that
stands out against the grid.
- Flash your player with this reference theme. You will get screens
that look like this:
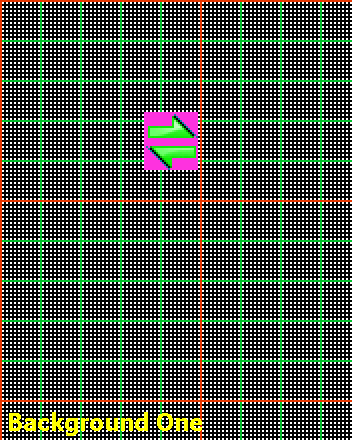
Imagine this is the actual screen of your player. With a keen eye
and some patience you can count that the image has to be positioned
at Top=56, Left=71. And you know that Background one is used here.
Use this data to create a slide and compare the preview to the real
screen. Repeat until everything is perfect.
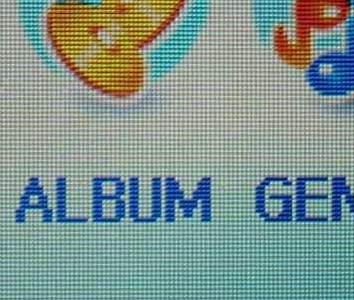
- If possible, get a digital camera and take pictures of the screen
in macro mode, or as close as possible. With a decent resolution, it
is much easier to count pixels than on the real screen. See this
example I made when making H300 slides.
|
|
|
|