Mapping Dialog
This is quite a beast of a dialog, but it's impossible to wrap such a complex operation in a simple dialog. So, deep breath, and let's go:
- Terminology: "Source" and "Glossary" are used here as "the non-tbx format". The name is not ideal, since it may also be the target, but "the non-tbx format" sounds so clumsy.
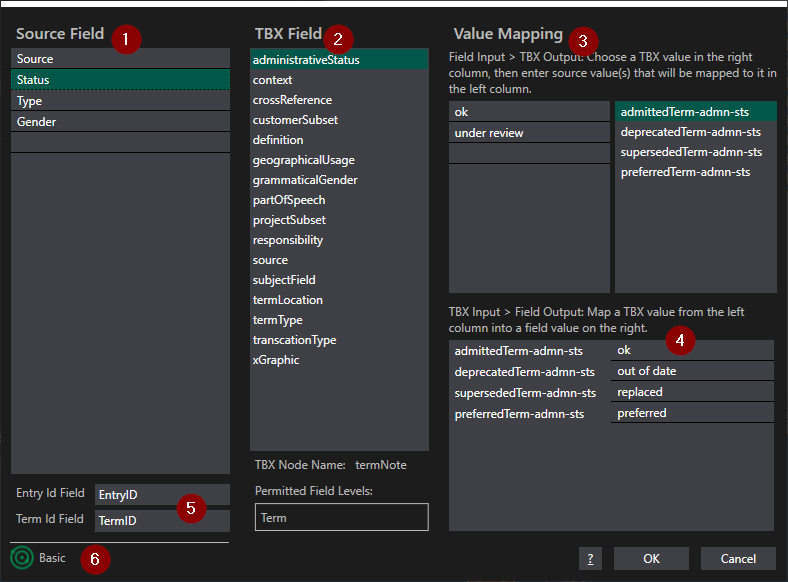
- Add Source Fields. These are the fields in your glossary that do have equivalents in TBX. Only add fields that differ from the tbx level you selected. Some examples:
- you have a Status field, and want to link it to the roughly equivalent administrativeStatus in tbx. Define it in the mapping file as in the screen shot.
- you have a source field, which is the same in tbx. Don't add it, it will automatically choose the correct tbx field.
- you have a Region field that has no equivalent in tbx. Do nothing, it will automatically be represented as a generic note field.
To add a new field. click on the plus button above the list. To delete, select a field and click the minus button. Once you are done, click on a field to select it and move to the next step:
This has no function for Core, where you can only choose Entry or Term ID fields. - Select the corresponding TBX Field. The contents of this list depend on the dialect you chose in the TBX options. Below the list, you see some features of the TBX field, mainly interesting if you want to edit the file in a text editor later.
Note that relatedContent and relatedTerm refer to term or entry IDs. If a referenced ID does not exist, your TBX is technically invalid. The Converter does no verification here.
This list is not visible for Core. - If your current field has no fixed list of values, move to step 5, otherwise the Value Mapping tables are visible. They are separated for conversions to and from TBX. First you define mappings into TBX: Select one of the possible TBX values, and then add one or more field values on the left. A bit cumbersome, but since multiple source values may map to the same TBX value, it has to be done that way. Repeat until all possible source values are covered.
But what if your source value is a plain text field and can have any value at all? For example, you may use an equivalent to partOfSpeech, and your source has more values than the 4 that TBX allows. In that case, use a default value. Choose the fall-back TBX value on the right (e.g. other) and enter an asterisk * in the left column. Now all undefined source values will convert to other in the TBX output.
Or you can just not do anything and they will convert to generic note fields. All depends on what suits your workflow.
This table is not visible for Core. - It's much easier to map from TBX. Just enter the glossary values in the right column, line by line. You can use the same value more than once: for example TBX defines 6 term types, while your glossary may only know 2. Leave a line empty, and the output value will be empty, too.
- TBX allows to assign ID values to entries and terms. These are interesting for cross references, or merging. If you want to preserve them, you can define glossary fields that correspond to TBX IDs. Leave these empty if you don't want to convert IDs. For example an Excel glossary may have a column called Entry ID, in which case that's what you enter here. See here for mapping to a MultiTerm termbase.
Note that the Converter automatically creates entry IDs in TBX, if none are defined in the glossary. - The current dialect, just as a reminder, since it affects the available fields.
Created with the Personal Edition of HelpNDoc: Full-featured Kindle eBooks generator